By using a POE switch, you can connect multiple IP Cameras to one switch and then only have to run one ethernet cable back towards the NVR. How you connect the switch to the NVR is a little different based on the type of NVR that you have.
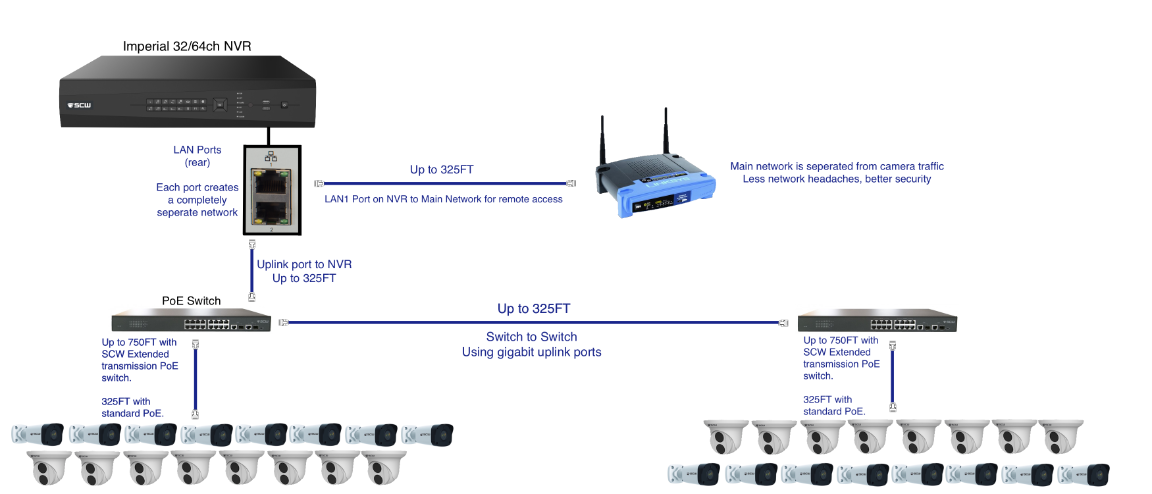
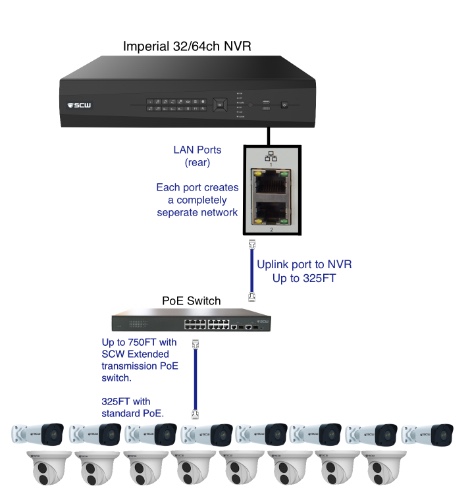
Using POE Switches on our Imperial Line (NON-POE NVRs with Dual Nics and Subnet)
Ideally, whenever you use a POE switch you want to use a NVR specifically designed for POE switches.
If you notice in the wiring diagram, NVRs that are specifically designed for POE switches don't require you to connect the cameras to your main network (through your router) because they have some router functions built in.
Our Imperial Line of NVRs have a second, private LAN port, which will keep the cameras and their video data off of your network. This subnet (secondary hidden network) increases network stability by separating your campera network traffic from your main network traffic and reduces cyber security risk by not exposing your cameras to the internet. We strongly recommend using a commercial grade NVR with these sort of cyber security protections, like our Imperial line of NVRs, if you are using POE switches.
Using POE Switches on our Admiral Line (POE NVRs with a Single Nic)
Most POE NVRs, including our Admiral Line also have a subnet - the POE ports. These ports also hide your cameras from the internet and reduce cyber security risk.
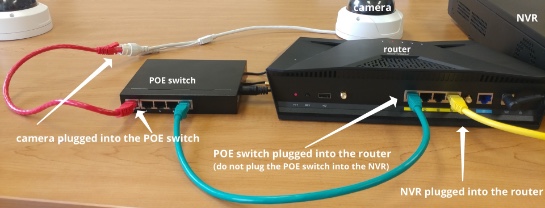
Although not recommended because of the increase in cyber security risk, it is sometimes unavoidable to add a camera that is on your main network to your POE NVR. This guide covers how you would wire this sort of setup:
Q. What if my NVR only has one NIC and no POE ports?
A. This is substandard device with no cyber-security protections. We advise against using this type of product. The wiring will be identical to the wiring below for a POE NVR using a POE Switch.
How to connect a POE Switch to a NVR designed for POE Switches:
1. Plug the IP Cameras into the POE Switch.
2. Plug the POE switch into the NIC 2 on the NVR.
3. Plug the POE switch into the wall outlet.
4. Follow the instructions on how to tell the NVR to add and record those cameras:
How to connect a POE Switch to a POE NVR:
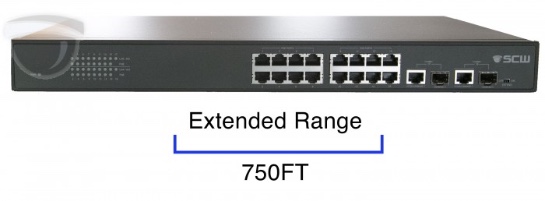
For situations where home runs from each camera back to the poe ports on the the POE NVR isn’t ideal, you can use a POE switch to reduce your cabling or to allow you cameras to be connected at greater distances than 750 (our Admiral Line has extended transmission POE) or 300 feet (normal POE NVR distances). Using a POE switch also allows you to connect multiple cameras to one switch and then only have to run one ethernet cable back to the network that the NVR is connected to.
Instructions for Connecting A POE Switch to a POE NVR
Step 1: Get a POE Switch
The first thing you want to do is to get a POE switch. Obviously, we recommend our Extended Transmission line of POE switches here. They allow you to plug in an Extended Transmission enabled IP camera (like our Admiral Line) at 750 feet rather than the normal 300 foot distance.
You will also want to make sure that your POE switch can provide the needed power for each PoE port (usually 15 but sometimes 30 W) and that the Total POE Power Output supports all the cameras that you plan on plugging in. Some POE switches do not allow you to use POE on all ports at the same time. Some POE switches are designed for lower-power IP phones, rather than IP cameras, and don't provide enough power per port to power up a camera.
Remember when deciding placement that POE switches need power from a standard 110v wall outlet, but do not power on the switch at this time. You will also want to get to step 3 (after you run your cable to camera and the router) before you turn it on.
If you already have a POE switch but realized that you need to run longer than 300 feet, you can add this POE extender to get another 300 feet from a normal (non-extended transmission) POE switch. You do not need to plug in our POE extender; it uses POE power to power itself.
Step 2: Connect your IP Cameras to the POE Switch
Connect each camera to the POE switch, be sure to keep one port open in order to connect the switch to the rest of the network.
Step 3: Plug Your POE Switch into the Router
Once the cameras are connected to the POE switch you will then connect the switch to either the router or regular switch that your NVR is also connected to.
Step 4: Now Power on the POE Switch
Step 5: Add the Cameras to Your NVR
Once the cameras are powered on you can then assign each camera a IP address through your NVR user interface, so that you can add and record those IP cameras:
Just Getting Started with Security Cameras?
Get the SCW Beginner Guide!
New to security camera systems? Confused by Analog vs IP? Bullet vs Dome? Indoor vs Outdoor? Don't even know what PTZ means?
No problem! Download the SCW Beginner Guide and get all your questions answered right away!


